Prefer to watch instead of read? See the video walkthrough.
Overview
A configurable product is a Shopify product that has been linked to a set of categories and items in the NetSource Configurator app. Customers can then build a custom configuration from that product's page on your storefront.
Tip: If you already have an existing configuration that is close to the one you want to create, why not copy it and use it as a starting point?
Learn how here: Copy an Existing Configuration![]()
You will need to have an existing Shopify product that is set as a Configurator product, or create a new Shopify product.
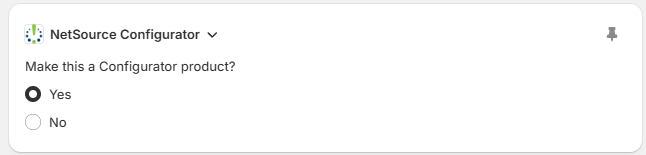
Create your first configurable product: First, you will need to identify a product in your Shopify products listing to be a Configurator product. Once identified, in edit mode, scroll down to the bottom of product edit page. If this is the first time setting a product to be a Configurator product, then you'll most likely see this:

If so, click + Block then click NetSource Configurator that appears immediately above. Now you can click the Yes option. This setting is saved immediately.
Tip: Click the Pin in the upper right corner and Shopify will always show this without going through the previous steps:
If you are creating a new Shopify product to be a Configurable product, once you save it, the NetSource Configurator block will appear at the bottom of the page. Select Yes to make this product available to Configurator.
Tip: We recommend that you set the Status to Draft so while you're creating your Configurator product it does not appear in any sales channels. Once you're satisfied with the configuration, set it to Active.
Go to the Configurator Products tab in the app menu and click Create configuration.
Steps
- In the app, click Configurator Products in the left menu.
- Click Create Configuration (top-right).
- In the configurator builder, use the product picker to search for and select the Shopify product you want to make configurable. The product's title and image will be displayed at the top of the builder.
- Add at least one category by clicking Add New Category (see the How to Add Categories
 article for details).
 - There are two Save options on the top-right.

- Save as Active - will display configuration on storefront with the product.
- Save as Archived - will save configuration in the Archived queue under Configurator Products, where you can "Restore" and activate later if you need more time to finish building all the configurable product options.

Once saved, the configurator widget will appear on that product's storefront page automatically, provided the theme extension is enabled.
Plan Limits
- Starter — up to 5 active configurations
- Advanced — up to 20 active configurations
- Premium — up to 50 active configurations
- Unlimited — no limit
To free up a slot, archive an existing product.
Configurator Edit Page — Header Row

The header of each configurator edit page shows the current customer-facing status of the product and gives you quick toggles for the settings that determine it. You don't need to leave the app to change any of them.
Status badge — "Visible to Customers" / "Currently Not Visible to Customers"
This badge tells you, at a glance, whether a shopper on your storefront would actually see the configurator for this product right now.
- Green — Visible to Customers: every condition required for the configurator to render is met. Customers visiting this product's page will see and be able to interact with the configurator.
- Red — Currently Not Visible to Customers: at least one condition is blocking the configurator from rendering. Click the Why? button next to the badge for the full list of reasons. Common causes include:
- Your subscription plan isn't active.
- The product's Make this a Configurator product? setting is set to No.
- The configurator is archived.
- The Shopify product status is Draft or Archived (which 404s the product page for shoppers).
- No groups or custom options have been added yet.
Each reason in the Why? popover is independent — you may need to address more than one before the badge turns green.
Edit Main Product >>
Opens this product in the Shopify admin in a new tab. Use this when you need to change anything Shopify-side that the configurator doesn't manage — variants, base price, images, description, etc.
Preview >>
Opens this product's storefront page in a new tab so you can see the configurator the way a shopper would. Behind the scenes, the app generates a special preview URL that allows you to view the product page even when it's currently set to Draft or Archived, and signals the configurator to render even when the product would normally be hidden from customers. This means you can preview your configurator changes before making the product visible to shoppers.
This Product is: Active / Archived
Reflects the current archive state of the configurator for this product, and lets you flip it.
- Active: the configurator is live and the underlying Shopify product is in Active status.
- Archived: the configurator is hidden, the Shopify product is set to Draft (so it no longer appears in search or collections), and any linked saved quotes are archived or stopped from sending reminders.
Clicking the button opens a confirmation describing exactly what will change. Switching from Active to Archived is shown as a destructive action because it removes the product from the live storefront.
Configurator: On / Off
Reflects the product's Make this a Configurator product? setting (the Shopify metafield productAttributes.isConfigurable). This is the same flag you can edit from the Shopify product page, shown here so you don't have to switch tabs.
- On: the configurator widget loads on this product's page.
- Off: the standard Shopify product page renders. The configurator is skipped even if you've built groups and items for it in this app.
If you turn it Off and the product is currently using the dedicated configurator product template, the template is automatically cleared so the product renders correctly with the standard layout.
Template: configurator / default / (custom)
Shows which Shopify product template this product uses, and lets you switch it.
- default: the product uses Shopify's standard product template. The configurator app block can still appear on the page if you've added it to the default template in your theme editor.
- configurator: the product uses the dedicated configurator template, which gives the configurator full control of the page layout (header, image, configurator, action buttons).
- (other name): the product is on a different custom template. The button shows that template's name. Clicking it offers to replace it with the configurator template — be sure that's what you want, since you'd lose whatever the current template was doing.
Switching between default and configurator is reversible and instantaneous.
Next: How to Add/Remove Categories & Items to a Configuration